Mobile Commons: Broadcasts
Resolution Summary
Mobile Commons: Broadcasts
Answer
Provided information on Broadcasts
Resolution Category
A broadcast is an outgoing text message from your company to your subscribers. You can view all of your broadcasts in the "Text Messaging" menu under "Broadcasts". You can draft and send your broadcasts under the campaign you want to send them from.
Viewing all your Broadcasts

Your broadcasts view will provide easy-links to all your broadcasts. The statuses included are:
- All: shows all of your broadcasts
- Draft: shows broadcasts in draft mode
- Scheduled: shows broadcasts ready to send and scheduled for a future time
- Pre-Optimized: you'll only see this if you have optimized broadcasts turned on (See our Optimized Broadcasts article)
- Sending: messages that are currently in the process of being sent
- Optimizing: messages that are currently in the process of optimizing
- Optimized: messages that have been optimized and are ready to be sent
- Sent: messages that have been sent
- Needs Approval: if you have users in your account that are limited to requiring broadcast approval the messages they've created that are not yet approved will be filtered under here
- Rejected: messages that were sent for approval but where rejected

Export all Broadcasts: you can export details about all your broadcasts by going to the Text Messaging Menu > Broadcasts > Save as CSV
Your export will include the following Columns
- ID: broadcast ID
- Name
- Status: Draft, Scheduled, Pre Optimized, Sending, Optimizing, Optimized, Sent, Needs Approval or Rejected
- Start Time
- Delivery Time
- Recipients
- Sent
- Failed Permanently: how many messages failed to send to their recipient permanently
- Undeliverable: how many messages were sent to undeliverable phones
- Opt Out Rate: % of opt outs per overall message count
- Links Clicked: number of clicks
- Links Click Rate: % of clicks per overall message count
- Response Rate: % of responses per overall message count
- Replies_number: The number of replies excluding opt-outs
- Opt Outs: how many subscribers opted out as a response to this message
- Body: The content of the message.
- message type: SMS or MMS (For draft broadcasts this will be blank in the export).
- Include Subscribers: whether this was sent to all campaign subscribers or not
- Included Groups: any groups targeted
- Excluded Groups: any groups excluded from sending
- Campaign
- Created by: name of admin
- Target Name: mConnect or mData promoted by this broadcast
- Target ID
- Tags
Creating a New Broadcast
- You can create a new broadcast from within your Campaign or the Campaigns home screen. To access within a campaign simply click on "New Broadcast" under "Campaign Actions". Alternately, you can click New Broadcast under the name of the active campaign on the Campaigns page.
Accessing from within a Campaign:
Accessing from Campaigns Home Screen: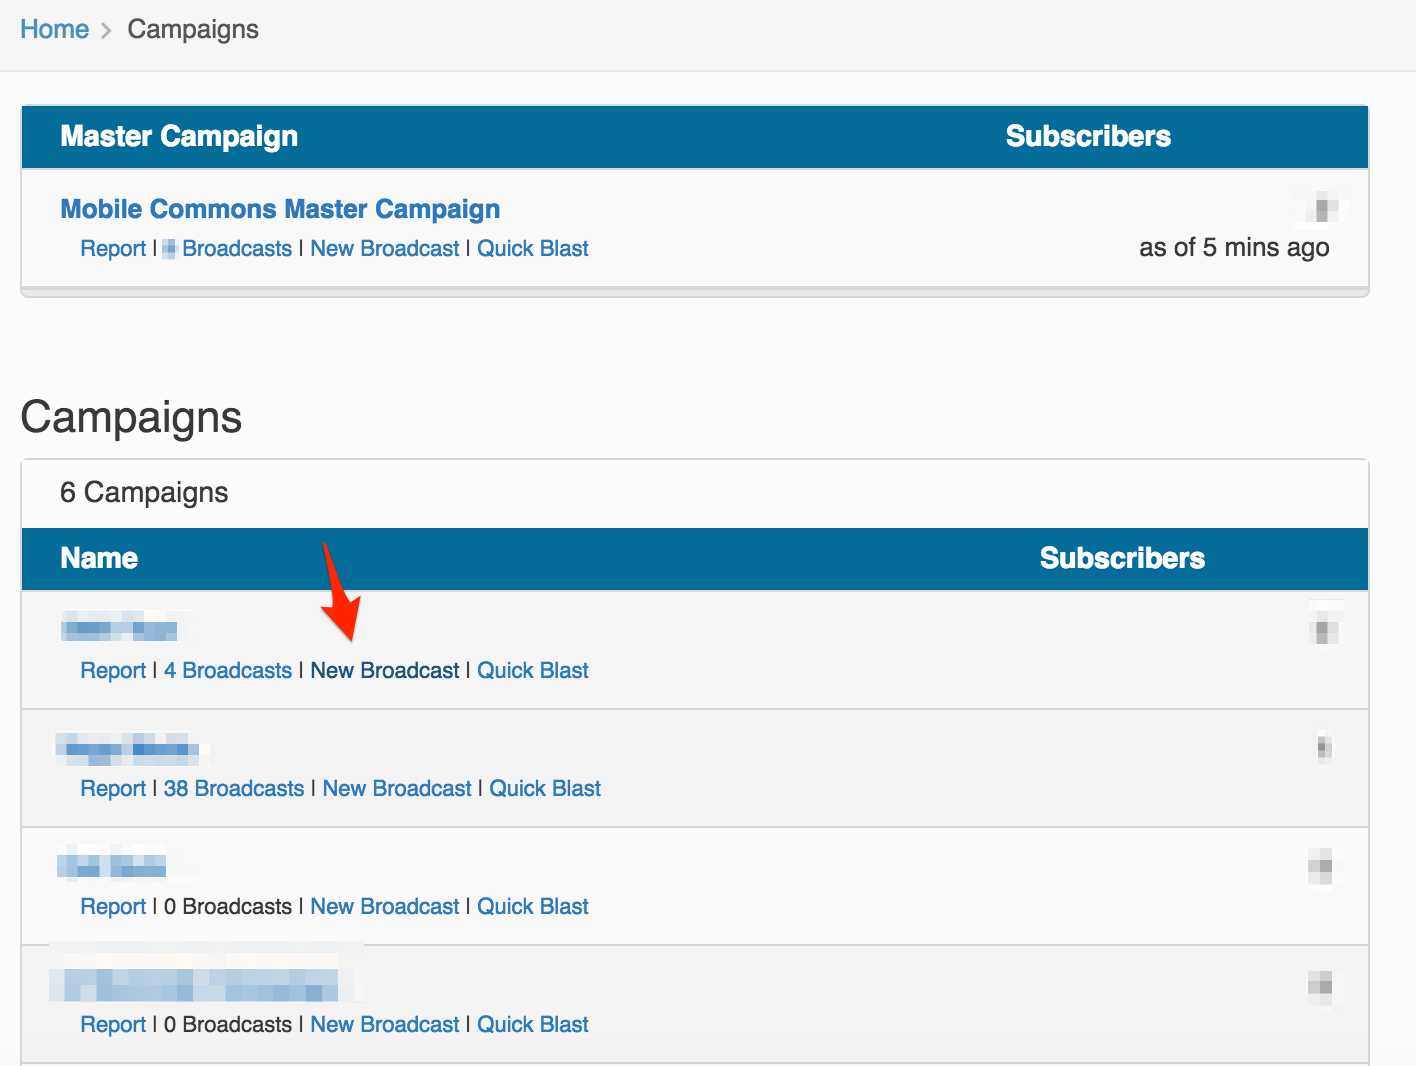
- Give the broadcast a name for internal use that describes the message and/or describes the date/time of the message.
- Create the broadcast conversation. (Click here for more on creating broadcast conversations).
- Click Save & Continue.
- Define the recipients.

- To send to all subscribers in that active campaign: Check the Send Broadcast to All Campaign Subscribers box.
- To send to all subscribers in that active campaign plus a group: Check the Send Broadcast to All Campaign Subscribers box and type the name of the group to target in the Also include the following groups box.
- To only send to a specific group or groups: Type the name of the group to target in the Also include the following groups box.
- To send to the subscribers in that active campaign and suppress a group or groups: Check the Send Broadcast to X Campaign Subscribers box and type the name of the group to suppress in the And suppress the following groups box.
 NOTE: Any time you include a group or groups in a broadcast, they are automatically subscribed to that campaign. (However, they do not receive the opt-in conversation.)
- Click Save & Continue.
- Review & Schedule.
- At this step we will show the names of the groups used with this broadcast and the estimated recipients. You can hit "click to load count" to show the count of each group.

- Review your message. If you need to make edits, click Conversation to go back to the Conversation page.

- Make sure the number of estimated recipients seems correct.
- Schedule the Message.
- Delivery Time:
- Choose Send Now to send the message immediately.
- Choose Start sending at to send the message at a date and time in the future. Define that date and time from the drop down menus for year, month, day, hour and minute
- Choose Make this Broadcast Recurring to sed the message on a recurrence. This allows you to select the recurrence "Send Every Day"; "Send Every Week Day (Mon - Fri); "Send Only on Weekends"; "Send Same Day Once a Week"; "Send Same Day Once a Month". NOTE: Recurring broadcasts won't be available if you have "Optimized broadcasts" turned on. You will need to send an email to your mobile strategist OR mc_support@uplandsoftware.com to turn off "optimized broadcasts" for a temp. period to schedule a recurring broadcast, then to turn it back on when done

- Delivery Options:
- Choose Send Normally to send the message out in the company’s time zone (You can see/change your company’s time zone from Account Setup > Edit.).
- Choose Automatically adjust for each recipients time zone to send out the message in the subscriber’s time zone (based on the normalized address in their profile).
- Choose Throttle this broadcast to stagger the message over 1-5 days between certain hours of the day. You can choose the number of days and hours of the day from the drop down menu. This is very useful if you are asking people to take an action that you don’t want everyone to do at once (For example, you may want to throttle calls to a legislator so you don’t overwhelm their switchboard).
- You can unschedule/Stop broadcasts that are sending OR scheduled for future send by hitting the "unschedule" button.
- Delivery Time:
- At this step we will show the names of the groups used with this broadcast and the estimated recipients. You can hit "click to load count" to show the count of each group.
Notes:
- If you Stop a broadcast in the middle of sending, you can re-schedule it later and it will continue from where it left off. The previous recipients will be skipped.
- MC will recognize and de-duplicate phone numbers in targeted groups/recipients. A phone number cannot receive the same broadcast message twice within the actual broadcast sending process.
Broadcast Test Messaging
When Mobile Commons users craft content, it’s critical that the content can be quickly and easily tested so that message content can be experienced across a mobile device. Mobile Commons now provides this functionality so that testing is just a quick click away. Nestled below the scheduler on “Review and Schedule” step, one may enter a phone number and click “Send Test”. The message will then be sent to the applicable mobile device number.
Notes:
- Only the first message in a conversation can currently be tested.
- Cannot be used to test triggering mConnects, mdata, etc. This feature is basically built to test the content of the first message only.
- The phone number must exist in that short code’s profile database for a test to run effectively.
- Only one phone number can be tested at a time.

Broadcast Reports
Each sent broadcast has a broadcast report. You can find it by clicking the link for the broadcasts in a given campaign.
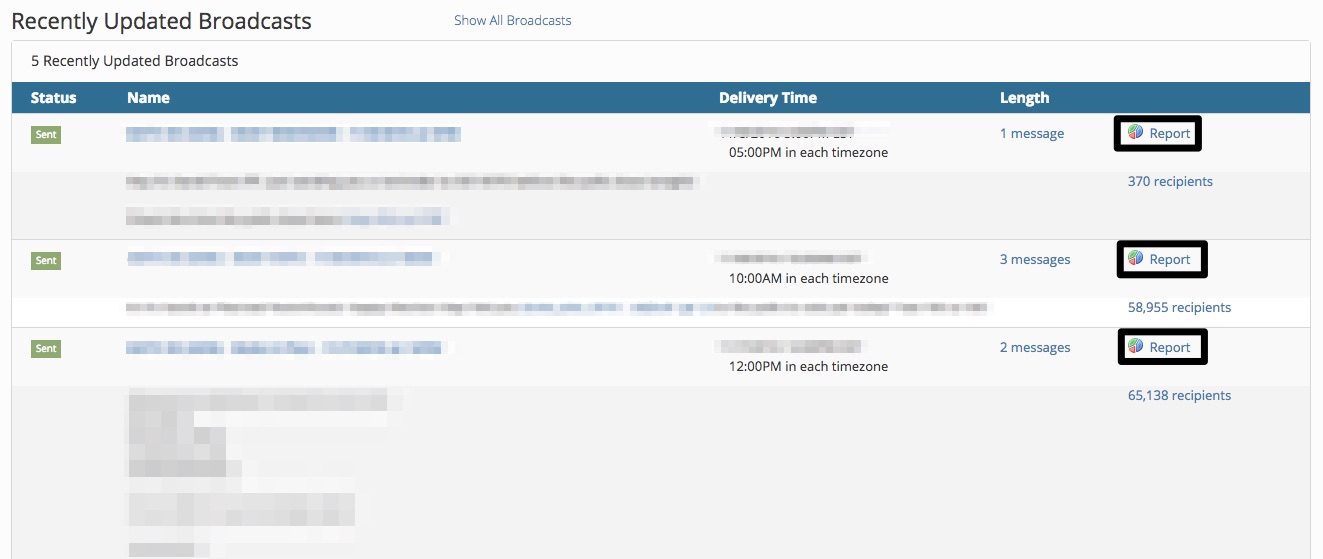
This takes you to a list of all the broadcasts for that campaign. Click the name of the broadcast, then click Report from the Broadcast Actions box.

The broadcast report includes:
- The graph of number of replies (in green) and the number of opt-outs (in red); you can select a date range for this graph NOTE: The graph's replies include both the broadcast's information responses and opt-outs. This means that if the graph indicates 4 replies and 2 opt-outs, it means that 2 of the replies are classified as opt-outs.
- A Page component with two arrows on the right-hand side to navigate through the different versions of the broadcast conversation
- Messages sent and total recipients. Your total recipients may be lower due to end-users not being able to receive a text message (usually related to their carrier or plan)
- The response rate to each message
- The type of response received, "Reply", "Opt-Out", "Answer" etc.
- Opt-Out counts at each level of messaging
You can export your messages by selecting the hyperlinked messages number and selecting "Save as CSV". Your export will include
- Phone Number
- Direction (outgoing or incoming)
- When (timestamp of message)
- Body (content of message)
- Message Type
- Status (includes sent, failed permanently or queued)
- Shortcode
- ID (of profile's message, unique)
- Message ID (platform's message ID for that broadcast)
- Campaign Name
- Profile Status
- Profile Fields (includes all standard and custom fields)
Cloning a Broadcast
If you would like to clone a broadcast, you can do so by clicking the link for the broadcasts in a given campaign. This takes you to a list of all the broadcasts for that campaign. Click the name of the broadcast, and then click Clone from the Broadcast Actions box.
Cloning a broadcast allows you to re-send the exact same broadcast you had sent previously - or an edited version of that broadcast. For example, let’s say you sent out a great holiday message in December of 2016. You want to send something similar out in 2017, but you don’t remember the precise wording. You can simply clone the 2016 holiday broadcast, tweak it to be relevant for 2017, and then send it out.
Cloning is also particularly useful if you have done a test send to a small group and would like to clone the broadcast for the actual send.
Deleting a Broadcast
A broadcast can be deleted only if it's in draft mode and no messages have been sent yet. If a broadcast was scheduled and sent to a portion of the list then stopped and moved back to draft, then it cannot be deleted.

Internal Information
Question: Product How-To / Training